How to Create a Jenkins CI-CD Pipeline

Hello Everyone, Welcome to my MediumPage!! In this article I would like to do a demo project on Jenkins CI-CD Pipeline.
Jenkins: Jenkins is an open source automation server. It helps automate the parts of software development related to building, testing, and deploying, facilitating continuous integration and continuous delivery.
Prerequisite:
- Jenkins install
- Knowledge on GiHub, Git and basic Python
For Jenkins Installation and Jenkins Setup, please see the attached link Jenkins documentation.
Let’s start to create a Jenkins job. I have created a Git repository and named it Jenkins-CICD-Pipeline. Inside that folder I have created an app.py python file. Inside the app.py file please type the below simple scripts for our Jenkins CI-CD Pipeline:
def my_function():
print(“Hello from Jenkins CI-CD Pipeline”)
print(“……………………………”)
my_function()

Attached is the snapshot shows the sample repository.

Step 1: Click on ‘New Item’ to create a new Jenkins job.
First, open a browser, navigate to your Jenkins URL, and log in using your Jenkins user name and password.
Then, on the Jenkins Dashboard, click the New Item option on the left-hand side menu.
Step 2: Enter the name of Jenkins job, Choose ‘Pipeline’ and Click ‘OK’.

Step 3: Enter Job Description if necessary(Optional).
Step 4: Please checked the GitHub project box under the General tab on the configuration page. Then, copy the GitHub repository url and paste the repository url into the Project url.

Step 5: Scroll down to the Build Triggers section and check the GitHub hook trigger for GITScm polling box, see the attached screenshoot here 👎

Step 6: Next, scroll further down to the Pipeline section and specify the following values:
- Definition: Pipeline script from SCM
- SCM: Git
- Repository URL: Your repository URL
Please see the attached screenshoot here 👎

Then save it. Also add a credentials. Add your GitHub account name under username field and paste your access token into the password field. In the ID field enter jenkins-webhook-idNe or you can give a name whatever you want.
Step 6: Configuring a Webhook in GitHub:
To run a job in Jenkins we have to first create a webhook in the GitHub repository. This webhook will notify Jenkins as soon as a new push occurs in the repository.
Please follow the steps below to create a Webhook.
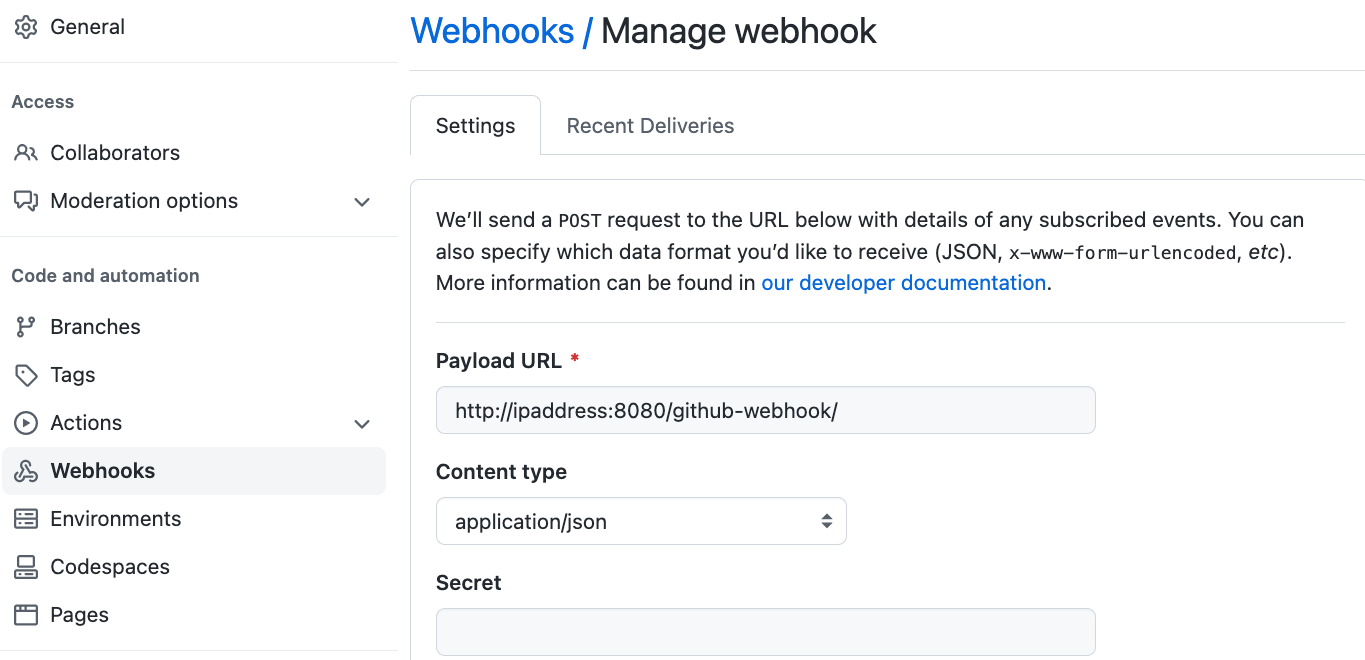
- Please navigate to the Settings page and click the Webhooks tab on your GitHub repository. On the Webhooks page, click Add webhook.
Please see the attached screenshoot here 👎

2. Specify your Jenkins URL and append /github-webhook/in the Payload URL field. For example, HTTP://jenkinsURLhere/github-webhook/.

Note: if ipaddress:8080 doesn’t work, you have to specify your ip address instead of localhost. Once webhook creation successful, you will see webhook has been successfully added otherwise you will see an error message.
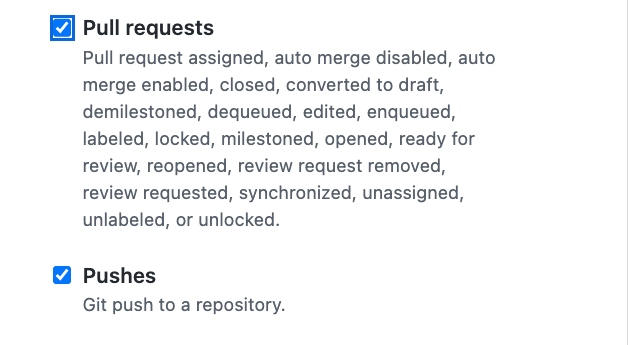
3. Now On Which events would you like to trigger this webhook selection, click the Let me select individual events option.
Selecting individual events, see the attached screenshoot here 👎

4. Scroll down and check the Pushes and Pull requests checkboxes. These options will ensure that GitHub will send a payload to Jenkins during these specific events.

5. Validate the webhook by clicking on the Add webhook button at the bottom. If the webhook validation went well You will see webhook successfully created.
Step 7:Executing and Triggering the Jenkins CI CD Pipeline Job
Now, you’ve created and configured the pipeline. Question: how do you know that the pipeline works? Jenkins provides a Pipeline Stage View plugin to help you view the pipeline status.
- To open the pipeline status, open the pipeline in Jenkins and click on Status. As you can see below, the Stage View status shows “No data available” because there hasn’t been an event that would trigger the pipeline.

- To generate initial build data, click Build Now and wait for the build process to complete. You can see the Stage View now has one entry, saying that there are no changes in this build. You can also see the console output by clicking on the console, see the screenshoot.

Note: As you can see, I build my pipeline many times as I had an issue of the pipeline syntax on the jenkins file. See the pipeline here. It was not running.

When I run it it was giving me below error on the console output:
- WorkflowScript: 6: Expected a step @ line 6, column 17.
- echo ‘Build-Hello Jenkins’
- ^
- WorkflowScript: 11: Expected a step @ line 11, column 16.
- echo ‘Test-Hello Jenkins’
- ^ WorkflowScript: 16: Expected a step @ line 16, column 16. echo ‘Deploy-Hello Jenkins’
- ^
- 3 errors
After doing little research, I put double quote instead of single quote on each echo statement and also corrected each stage name with the double quote and then build the status again from Jenkins dashboard and figured out issue has been fixed. But it took while 😫 to fix it. 🆒 😃


3. Now, test the pipeline by committing a new test file to the repository. To do so, go back to your GitHub repository and click click Add File → Create new file.

Enter test as the new file’s name and add content test.
Finally, click Commit new file at the bottom of the page.
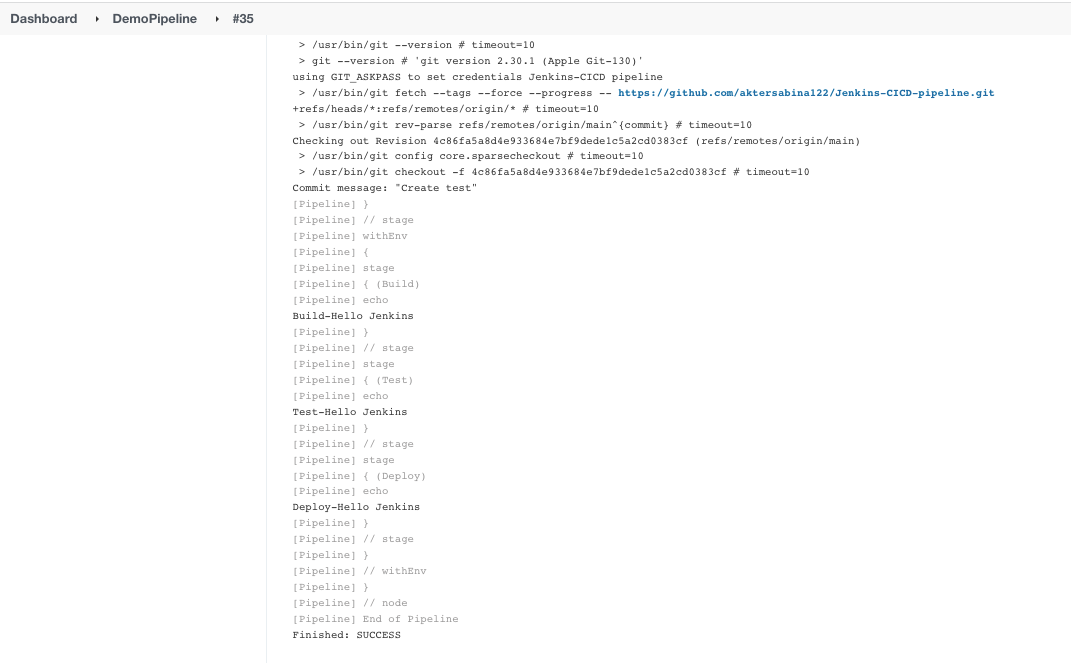
4. Now, Go back to your Jenkins pipeline status page, and you should see a new build entry with one commit, as shown below.

You can see the output from the console:

Conclusion
In this tutorial, I showed you how to set up a webhook in GitHub for Jenkins Pipeline. Also describe how to create a Jenkins CI CD pipeline to automate the software development lifecycle.
Thank you everyone 😃, for reading my blog!!
Stay Tuned for my next project!!
👏👏👏👏 Happy Learning!!
If you think, this article is helpful 😄, please give me a clap 👏 👏👏👏to inspire me.
Please connect me on linkedin 👎
https://www.linkedin.com/in/aktersabina122/
Please follow me on Medium and Twitter 👎: